
티스토리 뷰
nestjs 에서 passport를 사용한 local 인증 구현 흐름 분석

passport 에서 아쉬운 점
1. Request 객체의 user key로 결과값을 반환 받는데, 공식문서에서 설명이 미흡한 점.
2. 위의 1번 항목, local.strategy 에서, user key 대신 다른값으로 받을 수 있도록 속성 변경 못하는 점(내가 못찾았거나)
3. Interface를 만들어서 usernameField, passwordField, requestField 로 기본 제공되었다면 어땠을까 함.
위의 3번 항목, 직접 사용자가 인터페이스를 구현하여 보완 하면 사용과 분석이 편리할 듯 함.
Source code
필요패키지 설치 후, 모듈과 서비스를 cli로 설정
$ npm install --save @nestjs/passport passport passport-local
$ npm install --save-dev @types/passport-local
$ nest g module auth
$ nest g service auth
$ nest g module users
$ nest g service users
하드 코딩된 내용으로 사용자 목록과 사용자 이름으로 find 메서드를 사용하여 검색 기능을 만든다.
실제 앱에서는 TypeORM, Sequelize, Mongoose 등을 사용하여 모델을 구축한다.
users/users.service.ts
import { Injectable } from '@nestjs/common';

// This should be a real class/interface representing a user entity
export type User = any;

@Injectable()
export class UsersService {
  private readonly users = [
    {
      userId: 1,
      username: 'john',
      password: 'changeme',
    },
    {
      userId: 2,
      username: 'maria',
      password: 'guess',
    },
  ];

  async findOne(username: string): Promise<User | undefined> {
    return this.users.find(user => user.username === username);
  }
}
UsersModule 에서 이 모듈을 외부에서 사용할 수 있도록 UsersService를 내보기로(exports) 추가해야 한다.
users/users.module.ts
import { Module } from '@nestjs/common';
import { UsersService } from './users.service';

@Module({
  providers: [UsersService],
  exports: [UsersService],
})
export class UsersModule {}
AuthService는 사용자를 검색하고 암호 확인하는 작업이 포함되어 있다. validateUser() 메서드를 만들고
ES6 스프레드 연산자를 이용해서 { pasword와 ...나머지 }로 편하게 사용자 객체에서 암호를 제거할 수 있다.
validateUser() 는 Passport 로컬 전략의 메서드에서 호출하면 된다.
auth/auth.service.ts
import { Injectable } from '@nestjs/common';
import { UsersService } from '../users/users.service';

@Injectable()
export class AuthService {
  constructor(private usersService: UsersService) {}

  async validateUser(username: string, pass: string): Promise<any> {
    const user = await this.usersService.findOne(username);
    if (user && user.password === pass) {
      const { password, ...result } = user;
      return result;
    }
    return null;
  }
}
이제 AuthModule 에서 UsersModule을 가져오도록 업데이트한다.
auth/auth.module.ts
import { Module } from '@nestjs/common';
import { AuthService } from './auth.service';
import { UsersModule } from 'src/users/users.module';

@Module({
  imports: [UsersModule],
  providers: [AuthService],
})
export class AuthModule {}
Passport 구현. 이제 로컬 인증 전략을 구현하자. auth 폴더에 local.strategy.ts 파일을 만들고 다음의 코드를 추가.
auth/local.strategy.ts
import { Strategy } from 'passport-local';
import { PassportStrategy } from '@nestjs/passport';
import { Injectable, UnauthorizedException } from '@nestjs/common';
import { AuthService } from './auth.service';

@Injectable()
export class LocalStrategy extends PassportStrategy(Strategy) {
  constructor(private authService: AuthService) {
    super();
  }

  async validate(username: string, password: string): Promise<any> {
    const user = await this.authService.validateUser(username, password);
    if (!user) {
      throw new UnauthorizedException();
    }
    return user;
  }
}
super() 는 옵션 없이 단순히 객체를 호출한다.
기본값은 username과 password 이다. 다른 이름을 사용하려면 super({ usernameField: 'email', userpasswordField: 'pass' }) 로 다른 속성 이름 지정 가능하다.
AuthModule에서 방금 정의한 Passport 기능 사용하도록 구성한다.
auth/auth.module.ts
import { Module } from '@nestjs/common';
import { AuthService } from './auth.service';
import { UsersModule } from 'src/users/users.module';
import { PassportModule } from '@nestjs/passport';
import { LocalStrategy } from './local.strategy';

@Module({
  imports: [UsersModule, PassportModule],
  providers: [AuthService, LocalStrategy],
})
export class AuthModule {}
로그인 경로
/auth/login 기본 경로를 설정하고, 내장 Guard 를 적용하도록 한다.
auth/auth.controller.ts
import { Controller, Request, Post, UseGuards } from '@nestjs/common';
import { AuthGuard } from '@nestjs/passport';
@Controller()
export class AppController {
@UseGuards(AuthGuard('local'))
@Post('auth/login')
async login(@Request() req) {
return req.user;
}
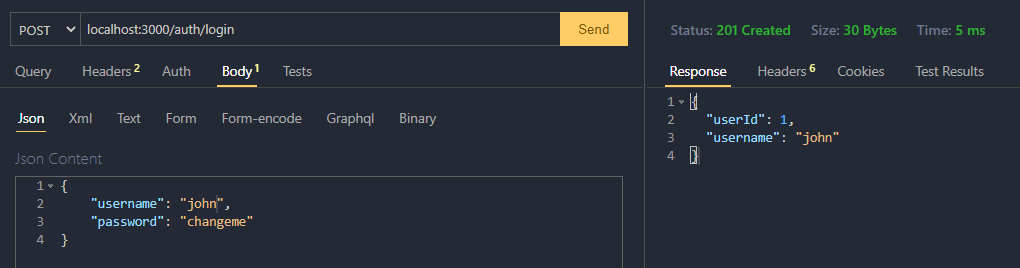
}API 를 호출해보면
$ # POST to /auth/login
$ curl -X POST http://localhost:3000/auth/login -d '{"username": "john", "password": "changeme"}' -H "Content-Type: application/json"
$ # result -> {"userId":1,"username":"john"}
AuthGuard() 에 직접 전략이름을 인자로 넣으면 코드베이스에 매직 문자열이 도입된다.
대신 아래와 같이 고유한 클래스를 만드는것을 권장한다.
auth/local-auth.guard.ts
import { Injectable } from '@nestjs/common';
import { AuthGuard } from '@nestjs/passport';

@Injectable()
export class LocalAuthGuard extends AuthGuard('local') {}
이제 /auth/login 에 LocalAuthGuard를 반영하고 콘트롤러를 업데이트하자
auth/auth.controller.ts
import { Controller, Request, Post, UseGuards } from '@nestjs/common';
import { LocalAuthGuard } from './local-auth.guard';

@Controller()
export class AuthController {
  //@UseGuards(AuthGuard('local')) => auth/local-auth.guard.ts 클래스로 만드는것을 권장
  @UseGuards(LocalAuthGuard)
  @Post('auth/login')
  async login(@Request() req) {
    return req.user;
  }
}
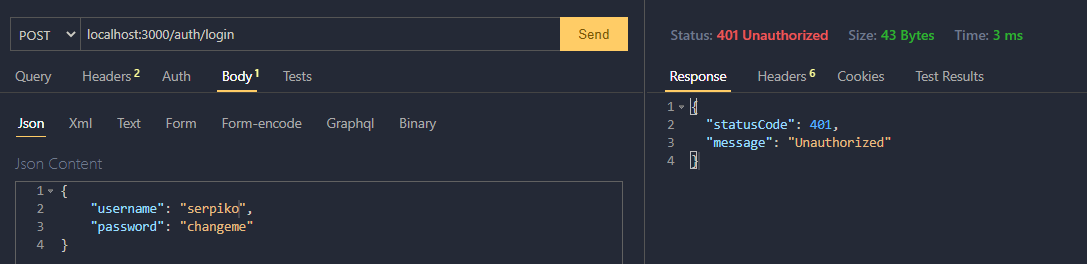
결과)
'■ 백엔드 ■ > NodeJS' 카테고리의 다른 글
| yarn berry install 에러 "The "yarn-path" option has been set..." (0) | 2022.06.28 |
|---|---|
| express res.status 처리 (0) | 2020.09.12 |
| 기존 cookie clear의 한계, 그냥 cookie overwrite로 해결 (0) | 2020.09.04 |
| A cookie associated ... `SameSite` attribute ( Node.js example for SameSite=None; Secure ) (0) | 2020.08.24 |
| express - multiple routes in a single line (0) | 2020.07.21 |